How To install carpet Flooring?
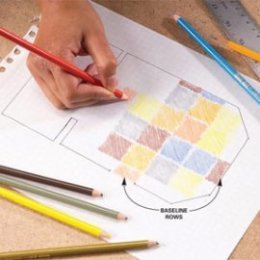
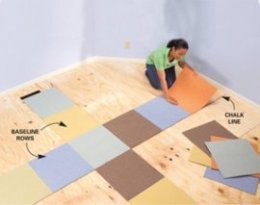
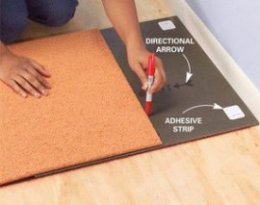
Photo 1: Draw a layout
Draw the space to measure on graph report to experiment with various styles. Mark your standard rows on design.
With practically unlimited carpeting options, the toughest part are selecting a design. You'll have to select the brand name you need before you start, since the companies have sizes of squares. After that sketch the room to measure and use coloured pencils or markers to attract when you look at the squares (Photo 1).
Arrange your design to avoid leaving thin pieces along the walls. They call attention to any wall surface perhaps not perfectly square. If at all possible, allow at the least 4-in.-wide parts of carpeting along each wall. Your last drawing will say to you how many squares of each shade you may need.
Determine the area's square footage by multiplying the length by the width (locate measurements toward closest base). For irregular-shaped areas, divide the ground into individual areas, calculate the square video footage of every, then add all of them together. Purchase the carpet, adding an additional 10 % for waste.
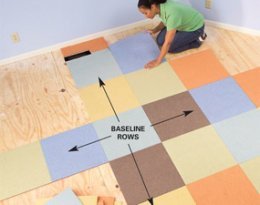
Assess your existing flooring
You can easily lay carpet squares right over concrete, plywood and OSB or particleboard subfloors, along with over vinyl, tile, laminate and some hardwood completed flooring. One caution: The backing may ultimately discolor some wood flooring. If you later choose eliminate the carpet, you'll have to refinish the wood. Conduct a moisture test (kits offered at home facilities) before carpeting a concrete floor. In the event that moisture content is simply too large, you can secure the concrete, after that install the carpet. Allow new cement treatment for about 90 days initially. Any wood subfloor or existing flooring has to be solid, dried out and firmly fastened. Screw-down any free areas of floor and replace any water-damaged areas. This will be additionally a great time to discover and fix any flooring squeaks.
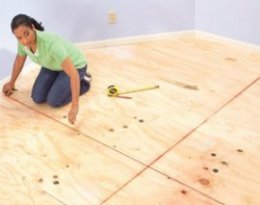 Photo 2: Layout outlines
Cleanse the floor, after that break chalk outlines parallel toward wall space to create perpendicular baselines.
Picture 3: Starting rows
Lay carpet squares along both baselines, starting in the center. Take away the defensive film, butt the squares firmly and adhere all of them to the flooring.
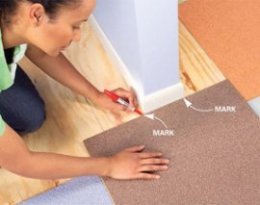
Photo 4: reduce tight to walls
Position the final carpeting square face down resistant to the wall and under the previous square. Mark it, cut it to size with a carpet knife and do the installation.
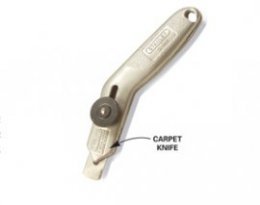
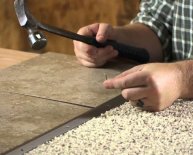
Carpet blade
Make cuts with a carpeting knife, which cuts carpet much more accurately than a regular energy knife
Prepare the ground by sweeping or vacuuming up all dust and grit. After that, making use of your sketch as helpful tips, find the place when it comes to base rows (Photo 2). Keep them as near into the center of the area as you are able to, simply because they guide all of those other set up.
Measure and snap your perpendicular baselines for all those rows (Photo 2). Lay carpeting squares (without glue) along both baselines to try the design. If you get spaces not as much as 4 in. close to walls, shift the design and snap new baselines.
To install the squares, begin where the baselines intersect and work outward (Photo 3). Maintain the directional arrows (Photo 4) from the back of the squares pointing in the same direction.
Peel the movie from the adhesive strips and butt each square tightly contrary to the preceding one. Do not adhere the very last complete square and soon you slice the last square to size (picture 4). When you slice the square, add two adhesive strips so there's one out of all sides. Extra pieces come in the box. Then adhere the final pieces.
You merely need certainly to stick the standard rows plus the squares on both edges associated with the baselines and over the perimeter of room. Others remain placed because of their particular hefty backing. (No, they don't really pop on when you are vacuuming!)
 A energy blade works OK for cutting the squares, but we prefer a carpet knife as it's much more precise. Use a sharp knife and make several shallow passes. The backing permits a crisp slice that will not unravel. Cut the squares on a smooth area, like hardboard. Avoid cutting on a plywood subfloor considering that the wood whole grain can pull the knife off line.
Photo 5: Fill Out
Install carpet squares in each quadrant, starting at center and going outward. Adhere only the squares along the baselines and wall space.
Utilizing the base rows in place, begin straight back in the center and fill in the quadrants utilizing a “step” design (picture 5). Just press each square snugly against adjacent squares, keeping carpet strands from the bones. It is simple to alter down squares for a more pleasing design, even though they are adhered. If the adhesive residue stays, remove it with massaging alcohol.
Picture 6: Mark slices positioned
Place a carpeting square right-side facing an archway wall, aligning it with downloaded squares. Mark the wall surface area on sides of carpet.
Close-up
Mark both edges of slice
Picture 7: Cut from the straight back
Flip the square over and use a marker and a carpenter's square to attract the wall shape through the scars you just made. Cut-out the orifice.
Cut against the side of the square for a straight-cut.
Photo 8: slip into spot
Install the square up against the archway wall surface. Fine-tune the cut, if required, therefore the square meets comfortable.
Picture 9: utilize templates for tough cuts
Make a full-size template for doorjambs with complicated trim and doorstops. Transfer the outline onto a carpet square, after that slice the square.
Photo 10: Fillers hide errors
Reduce filler pieces from scrap to fill any spaces between your wall space and squares. Wedge the pieces into destination, after that smooth these with your hand.
Picture 11: No transition strips needed
Butt the carpeting from the floor in adjacent areas, or overlap the edge of the adjoining floor.
Cutting carpeting to match around outside sides, archway walls and doorjambs is one of difficult an element of the task. Start by setting a square resistant to the face associated with archway wall, overlapping and aligned with all the previously downloaded square (Photo 6). Mark the carpeting on each region of the wall, then position the exact same square up against the side of the wall and level it.
Using the scars, describe your cut with your carpenter's square as a guide (Photo 7). You need to a little undercut the mark, after that fine-tune as required for a decent fit. This exact same technique works well with tagging and notching squares to match around corners.
To fit carpet around odd-shaped obstacles, eg doorjambs with angular trim, initially make a report template. You'll need to make a few measurements, move them to report, after that cut right out the orifice. It's going to most likely just take a number of tries before you decide to get a good fit. When the template fits, trace the outline on the straight back of a carpet square and cut it (Photo 9).
Don't be concerned if the cut actually perfect while end up getting a gap—carpet squares are extremely flexible! Only reduce a small sliver of carpet from a scrap piece and tuck it snugly into the space (Photo 10).
Because the carpet won't unravel, threshold pieces are not required. As an alternative, you can just butt from the floors next room or perhaps the existing limit (Photo 11).
Share this article
Related Posts

Latest Posts


