How to make jute?
 Photo: Kristi Mercer
I've been crushing on these jute net bottles for what may seem like permanently understanding even while that i possibly could totally make that look myself for plenty less!
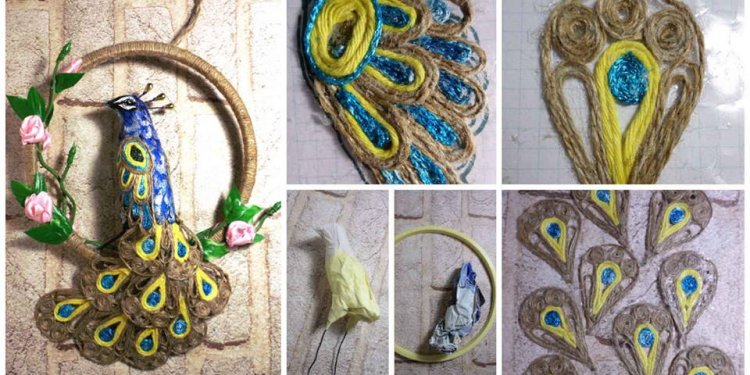
So, today i am delighted becoming showing you a brilliant easy option to cover any old container with your knotted jute internet! I do believe the most difficult part may be showing y'all the way I produced these nets, but We vow, once you get started, you won't think how easy it had been! We started with a few ordinary cup bottles—wine, olive oil—you understand, whatever I'd lying around.
Proceed with the aesthetic instructions below in order to make a!
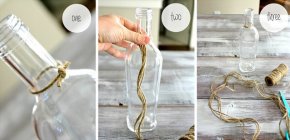
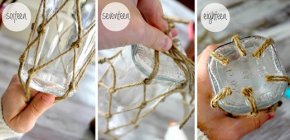
Step 1: link a ring of jute all over the top of bottle. This may develop the top of your internet. We tied it with a double knot to ensure it absolutely was protected and take off any additional.
2: Measure some jute four times the size of the bottle.
Step three: Cut five even more pieces for this exact same size for six total.
Tip! It really is far better to own an excessive amount of than too little. I'll show you tips on how to consume any extra you could have by the end. After playing around with some of the I discovered that it's less difficult which will make an even more tightly woven web with the addition of some more strings you can also make a thing that's much more open and simple through the use of less. The Majority Of my preferences were made with six strings, to make certain that's what I'll demonstrate with these days.
 Step 4: Fold one jute string in two.
Action 5: seafood that sequence through a ring you have made at the top of the container.
Step 6: Poke the ends for the sequence through loop to produce a knot.
Step 7: produce a knot aided by the cycle. Try this five more times before you have six knots, making an overall total of 12 strings dangling down your bottle. Slide the knots along your top ring of string as needed, ensuring they're evenly spaced.
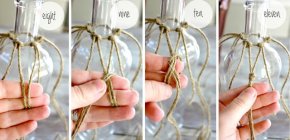
Tips 8-11: Now you are prepared start making the net! Start out with just the right sequence of 1 knot in addition to left string associated with the next. Loop the strings around your hands, going-over the strings, and through cycle to create a knot. Congratulations, you've made your first knot!
Steps 12-14: keep across the top choosing the right string from previous knot together with left string through the next. Take the time to make your entire knots in the exact same length from your top band so your net appears good and nice. Complete around that top line until each of your top strings has been used.
 Step 15: now you have to maneuver about the after that line. Maintain in the same style once the very first line, utilizing one correct sequence plus one left generate a diamond shape. Work the right path to the bottom of the bottle one line at any given time making certain maintain your diamonds during the exact same height.
Step 16: attempt your very best to make the bottom knots sit on the medial side associated with the container rather than underneath. This will assist your container to stay evenly on a-flat area as soon as completed. Adjust those bottom knots as required to sit simply quietly of this bottom advantage.
Step 17: Finally, it's time to connect it-all straight down. We used hot glue to prevent any knots regarding the bottom. Pull one collection of strings tight, include a dab of hot glue toward base of the container, and hold the couple of strings regarding for some moments before glue dries. Do the exact same with all the couple of strings right opposite the set you simply glued straight down. Work across the bottom of my bottle until every couple of sequence is glued straight down.
Action 18: take off the extra finishes.
There you have it; a quick and easy jute net bottle for only pennies!
Now, you might definitely decide to end the following, but we promised you we'd discover a way to use up all that additional string. I just covered it around the neck of my bottle. We started with a tiny dab of hot glue above among my knots on top ring of my net to secure the start of my string. I painted a layer of Mod Podge across the bottle throat and wound my sequence over everything the way to the top. Each and every time I'd to finish with one string and go onto another, i merely added a tiny dab of hot glue to secure the ends.
I am positively happy with how these pretty bottles turned-out and I also understand they will look fabulous in your home, too!
Share this article
Related Posts
Latest Posts


